How to Install Ink in Hp Envy 5055
Z7_3054ICK0KGTE30AQO5O3KA30N0
HP ENVY, DeskJet Printers - Replacing the Ink Cartridges
This document is for the following printers:
| Printer Model | |
| HP ENVY 5530 e-All-in-One Printer | HP ENVY 5536 e-All-in-One Printer |
| HP ENVY 5531 e-All-in-One Printer | HP ENVY 5539 e-All-in-One Printer |
| HP ENVY 5532 e-All-in-One Printer | HP Deskjet Ink Advantage 4515 e-All-in-One Printer |
| HP ENVY 5534 e-All-in-One Printer | HP Deskjet Ink Advantage 4518 e-All-in-One Printer |
| HP ENVY 5535 e-All-in-One Printer | |
This document contains steps for replacing the cartridges.
Cartridges types
Consult the following table to identify the correct cartridges for your area.
HP ENVY 5530 e-All-in-One printer series
| Cartridge Description | Country/Region | |||||
| North America & Asia Pacific (exclude India, Indonesia, China & Japan) | Western Europe | Middle East, Africa, Latin America, Japan & the Commonwealth of Independent States | China, India & Indonesia | |||
| Black cartridge | HP 61 Black | HP 301 Black | HP 122 Black | HP 802 Black | ||
| Color cartridge | HP 61 Tri-color | HP 301 Tri-colour | HP 122 Tri-colour | HP 802 Tri-color | ||
Deskjet Ink Advantage 4510 e-All-in-One printer series
| Cartridge Description | Country/Region | |||||
| North America | Latin America | Asia Pacific | Europe, Middle East & Africa | |||
| Black cartridge | N/A | HP 662 Black | HP 678 Black | HP 650 Black | ||
| Color cartridge | N/A | HP 662 Tri-color | HP 678 Tri-color | HP 650 Tri-colour | ||
Purchase replacement cartridges and other supplies from the HP Store or local retailers.
Replacing the cartridges
Follow these steps to replace and then align the cartridges.
Step one: Load paper
When you install a new cartridge, the printer prompts you to load paper so you can complete a cartridge alignment. Before you begin the alignment process, follow these steps to load paper in the printer.
-
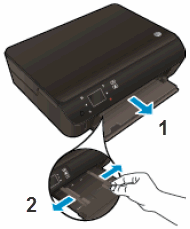
Open the paper tray door.
-
Grasp the door, and then pull it toward you to extend the paper tray.
-
Slide the paper width guides to their outermost positions.
-
Extend the paper tray
-
Slide the paper width guides to their outermost positions
Figure : Prepare the paper tray
-
-
Load a stack of plain paper into the tray with the short edge facing toward the printer and the print side down. Push the stack into the tray until it stops.
Figure : Load the paper into the tray

-
Slide the paper width guides in until they rest against the edges of the paper, and then slide the paper tray back into the printer until it clicks into place.
-
Slide the paper width guides in
-
Slide the tray back into the printer
Figure : Close the paper tray

-
-
Pull the paper tray extender toward you, and then lift up the end.
Figure : Pull the paper tray extender toward you, and then lift up the end

Step two: Replace the cartridge
Follow these steps to replace one or both of the cartridges.
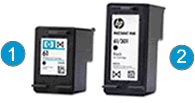
note:If you are enrolled in the Instant Ink program, you receive special Instant Ink cartridges. Instant Ink cartridges are larger than standard cartridges, but they fit in the carriage in the same way.
Figure : Standard and Instant Ink cartridges Standard cartridge Instant Ink cartridge
-
Press the Power button to turn the printer on, if it is not already on.
-
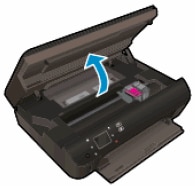
Open the scanner lid.
-
Open the cartridge access door. The carriage moves to the cartridge access area. Wait until the carriage is idle and silent before continuing.
Figure : Open the cartridge access door
-
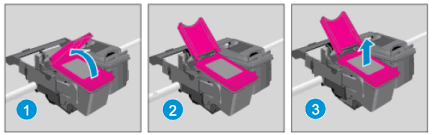
To release the cartridge, lift the lid on the cartridge slot, and then gently push the lid back until it stops.
-
Pull up on the cartridge to remove it from the slot.
-
Lift the lid
-
Gently push the lid back
-
Pull up on the cartridge
Figure : Remove the cartridge
-
-
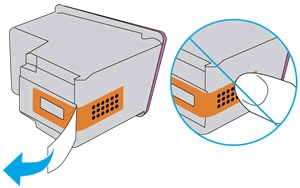
Remove the new cartridge from its packaging, and then pull the pull tab to remove the plastic tape.
Figure : Remove the plastic tape
-
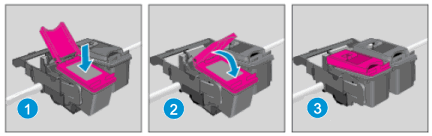
Hold the cartridge at a slight upward angle with the cartridge contacts facing the rear of the printer, and then slide the cartridge into the empty slot.
-
Close the lid on the cartridge slot to secure the cartridge into place.
note:
Insert the color cartridge in the slot on the left. Insert the black cartridge in the slot on the right.
-
Insert the cartridge
-
Close the lid
-
The color cartridge is on the left, and the black cartridge is on the right
Figure : Insert the cartridge
-
-
Repeat the previous steps to install the other cartridge, if necessary.
-
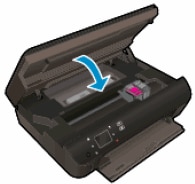
Close the cartridge access door.
Figure : Close the cartridge access door
-
Close the scanner lid.
-
Follow the instructions on the control panel to start the cartridge alignment. The printer aligns the cartridges and prints an alignment page.
-
Alignment page did not print?
If the printer did not print an alignment page, follow these steps:
On the printer control panel, touch the Settings icon (
 ), touch Tools, and then touch Align Printer.
-
How to Install Ink in Hp Envy 5055
Source: https://support.hp.com/id-en/document/c03737202